Showing posts with label Projects. Show all posts

Tuesday, February 19, 2019

A Free Styled Paper Fish

When you're 9 but you can't remember how it goes, 
since it's been a while, but you give it a shot from memory anyway.....


Wednesday, June 27, 2018

Laminating Day

Today I had a laminating day....

I had my stash of printables all good to go....


Surprisingly, it didn't take as long as I thought it would, but I was solid on getting them cut asap as they came out of the laminator.


Montessori 3 part cards for Multiplication 3x 


Clip cards for Noah in a summer theme.


More clip cards for Noah in a mermaid 10 frame theme.


Geometry shapes clip cards for Charlotte.


More Montessori multiplication 3x - but clip cards this time.


Birds and their eggs.  It's supposed to be 3 part cards, but I decided that we should only cut them to two to begin with.  They are absolutely gorgeous, and I've already had a lot of interest from the children about them.


More counting clip cards for Noah.


And how they look all baggied up when I was done.


Just making the most of the laminating and preschool stuff, since Noah is the last baby - and I won't need them after him.

Are you doing the laminating rounds at your place?  What are you laminating??

Wednesday, February 21, 2018

Using Tin Cans for Your Pencils


This is a practice that I have used for many years now.  I collect tin cans, decorate them with some pretty paper and store my pencils, paint brushes, odds and ends, and scissors in them.


First, I picked out a pretty paper.  Next, I cut them into strips of 41/4 inches wide.  Then, I used my super power double sided tape on the perimeter backside.  Lastly, I simply adhered it to the can, running it just under the top lip so it fit snug and tight.


Have you ever tried this project?   Let me know down in the comment section.


Tuesday, April 25, 2017

Sunday, April 23, 2017

Tin Can Pencil Containers

Heya lovelies!

Just jumping back in time to use my blog quota... I set myself a goal of 8 posts this month, but I was a little short, so I've come back to fill it out a little.

At any rate, today I made these super cute little pencil containers in about 10 minutes.

Super easy.
Super quick.
Super cheap.

Here's the supply list:

4 tin cans - cleaned
2 pieces of scrapbooking paper
double sided tape
guillotine


Cut your paper to a fraction under 4 and 1/4 inches.

Run the double sided tape along all the edges of your paper.

Adhere to the can.

That's it.


These are perfect for holding scissors, pencils, textas etc....

Let me know if you make some too.

Tuesday, February 12, 2013

Project Blackboard

I was busy surfing some blogs the other day, as you do,  when I came upon a project done by another homeschooling mum.   Sometimes you find things that are just the most perfect little projects for your own home.  As soon as I saw it I just KNEW that I would do it too.

I took the two middle glass panes out of my kitchenette so that I could replace them with home made blackboards.


The great part about this project is how quick and easy it was.

I got hubby to cut me down two pieces of wood that would fit.  Then I painted them with black chalkboard paint.  


This morning I put them in the frames and wrote our first verses on them.     


Oh, and if you've been blog hopping like me you'll see another little project idea sitting on the bottom right hand side as well.   LOL

AND tomorrow I will have ANOTHER project idea to share as well.  That one involves a colored printer, a laminator, and some magnets.

Thanks for visiting.

Thursday, January 10, 2013

The Story of a Sand Pit

As parents we are always thinking of ways to bless our little children with items that would bring them some form of happiness or educational value.

So earlier this week we went and got them a little sandpit.  Just a little plastic wading pool and some sand.

I don't know what was in our minds, but it sure wasn't what it actually turned out to be.


In a matter of hours we had this horrendous MESS in the patio section.  It was EVERYwhere.    It only took a couple of days before we called it quits.

Nothing makes you rethink an idea ever so quick as to find huge lumps of sand coming into the house and being deposited on the lounge and walls - yes I said walls.  Who knows how they managed that.  I am thinking that the water that they added helped somewhat.  I am also afraid at how much might have made it to the carpets - just good on me that I like to vacuum and have done a couple of rounds since then.


{ Photo does not give full credit to the complete and utter destruction debasement of the patio.}

As for the little children wearing it from HAIR to TOE.  Thoroughly and lavishly washing it through their clothing and sticking as much as they could to their skins and in their hair.  Getting back to their primitive bonding?  Possibly.

It was gross, and the extra work bordering insanity.

NOT so great an idea in real life after all.  Well, not at my house anyway.

Sometimes we have to learn lessons the hard way.

The sandpit was cremated by the heat wave sun the other day all over the grassy land in the backyard.

The little children cried.  The oldest cried the loudest.  I guess it's because she understands what death is.

It shall always be remembered for its delightful rugged outdoor friendship - however short it was.

Thanks for visiting.

Saturday, December 29, 2012

Making Storage Look Better

 
Well, I've been at it again.  Yep, making my little storage tubs look nicer.  I've picked up a few more since we last did some show and tell on them.  I need them for all the fiddly math and literacy centers I've been adding.
 
Here is how they look now:
 
 
Cute, hey?  Same little Owl theme, just pink.  Oh, and I just need to label them like the other ones as well. 
 
 
Thanks for visiting.

Saturday, December 1, 2012

A Can of Flowers - Phonogram Apples

I was changing over the letter tiles in Hannahs current word box to reflect her new set of words and was wondering where to put all her apple phonograms.   They were in the box taking up considerable room.
 
Then I got the idea of putting them in a little tin can.  That way they would be available for easy access for revisional purposes as we went along.
 
So, I went and found me a tin can.  Just a little one.  A baby one that had the potential to live a long and fruitful life.
 
I often keep a small stash of cans on a shelf in my school room - just in case I want them for one thing or another.  I never used to hoard junk but with older age I have found that they are easily turned into some sort of treasure.
I picked out a cute little owl patterned paper and used my guillotine to cut it to size.  Then I used my super power - double sided tape to adhere it to the can.
 
And voila~!!  She was born.


I popped our apple phonograms in and they sat so pretty.


A little bit like a rainbow or a field of flowers.


And here they will blossom until we use them again.


 I'm going to link this project up with:

 
Thanks for visiting.  :o)
  

Tuesday, November 13, 2012

Fancy Work

 
Today I'm going to do a quick walk through with how I do these:


As you can see I'm still learning what works and what doesn't.   In the future I'm thinking that a bright contrasting background would  make it look more appealing.
 
 
1.  I write my document up in Microsoft word.
 
2.  Then I save it as a pdf.
 
3.  Then I open the pdf and go to the 'Edit' tab.  I scroll down and take a 'snapshot' of the page.  I do this for EVERY page that I want to work with.
 
4.  As I'm taking the snap shots I'm putting them in Paint.  Each one is individually resized down to 400 pixels and saved.
 
5.  Once I have all the pages I want to work with I open Powerpoint.
 
6.  I copy and paste each page individually into the same blank page in Powerpoint.  Once they are there it's super easy to just move them around to where ever I want them.  I also make them a little smaller when I get them in there as well.  So that I can start layering etc...
 
7.  To get a patterned background I just copy and paste a background paper in there as well and send it to the back.
 
8.  I also use a text box to add the little words.
 
9.  And then I save them.  Then it's all good to go when I want to do show and tell. :o)
 
I hope that helps to explain how I do these show and tell pages.  :o)
 
Any questions.  Should I add any extra information?
 
Thanks for visiting.


Thursday, November 1, 2012

High Tea

 
High Tea went awesome~!!
 
We had a house full of girls with their mummy's and it all went awesome.
 
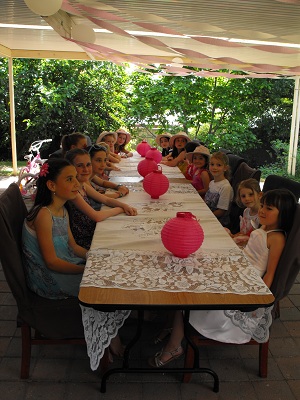
But first we had to set it all up.  Table cloths, chinese lanterns, balloons, and streamers.
 
 
I was a bit worried that we weren't going to have enough chairs or tea cups.  I'd had a LOT of RSVP's.  We even had a trip to Melbourne to secure some extra tea cups a couple of weeks ago.
 
 
Soon it was time to get dressed in our new dresses.
 
 
Here's my plan for the day:
 
2pm - Meet and Greet
 
3pm - High Tea
 
4pm - Craft ( make a card )
 
I got the tea sets out and ready.  I had made scones in the morning while we were doing all the housework.  Oh by the way we also had a house inspection this morning.  Perfect~!!   We got two important things done on the same day.  My house was clean, and not just tidy clean.  It was clean, clean.  Super clean.
 

I love the print on these cups.  So lovely and perfect for cups of tea.  No-one broke one either.  Nope, not even a single cup was lost.  Which is good.  It means that we can use them again.

 
All the girls sit down ready for Tea.  Well, all except one.  We had 15 girls.  We had to find another chair and pop it on the end here.


Having Tea.
 
 
While the girls were finishing off their tea and deserts the mummies got to have a cup of tea ourselves.  We had to use the ordinary blue mugs though.
 
Then afterwards they all made a card.
 
 
Such a lovely afternoon.  The weather was great, warm and sunny.
 
A couple of the other mums helped out with the dishes as I kept busy being hostess.  A couple of the other mums helped me out with the serving and card making.  I really appreciated their help. It made the whole afternoon be VERY successful.
 
We'll have to do Tea again.  :o)
 
Thanks for visiting. 


Monday, October 22, 2012

New Babies at the House

 
Just a quick little post to share our good news.  Yesterday we became the proud new parents of 5 little chookies.
 
Sorry about the lack of quality in the photos.  I was a couple of metres away using a zoom.
 
We got 2 white ones and 3 black ones.  The black ones are Australorps, and the white ones are Light Sussexs'.  They are only 6 weeks old.
 
 
So it will be a while before they start laying.  In the mean time they will make awesome pets for the children.
 
ps.  Did you know that eggs come out WET and SOFT but harden very quickly?
 
Thanks for visiting.


Sunday, October 21, 2012

Making Glue

 
Sometimes it's cheaper to just make your own things.  Even glue.  Yep.
 
 
To make glue I get out a little baby jar and put 2 teaspoon scoops of cornflour in it.  Then I add about 1 cm of cold water and mix.  When all the powder is thoroughly mixed in I add boiling water to fill the jar up.  And stir like crazy.
 
That's when I get the most awesome smoothest glue - just like store bought - for a fraction of the price.


I am considering experimenting with it to see if I can give it the long life / nice smell that also comes with a store bought glue.  Wondering what salt would do to it?  Or vanilla essence?

Thanks for visiting.


Wednesday, October 10, 2012

A Super Big Pocket Chart


Last night I got some inspiration and decided that I really, really, really needed a whopping big pocket chart.
 
So I pulled out my white board and turned it over to the back, and voila, I had a blank canvas.


I found some nice patterned paper that wouldn't mess with my eyes when I used the pocket chart and got that stuck on the board.


An up close of the patterned paper.   Unfortunately I did this project at night - so my camera didn't pick up the niceness of the pattern/color.   But it does look super nice in real life.


Once the background paper was down I got out my transparency film and cut them down.


Then I used my handy dandy double sided tape ( a super power that I have ) and got my pockets up and running.  I *LOVE* double sided tape~!!  And it is practically invisable too.


There is a LOT of space in this new chart for me to use.  A LOT more.  Much more than I have with the other versions that I've made.
 
Here's what I had in it this morning for school.


These are sight words for Hannah ( 3y6m ) but more on that on Friday~!!
 
Thanks for visiting~!!