Showing posts with label Classroom. Show all posts

Thursday, August 1, 2013

My Desk


Todays the day that I get to show you my DESK.


Yep.

This is where I am sitting while I write up this post.  :o)

{ The whole desk, minus the chair }


{ Top shelf }

I was running out of places to put books, so some of them ended up here.  Scrap paper on the far left.


{ Middle Shelf }

Handy Dandy Useful things like abacus, more plastic money, cards, counters, and pens.


{ Bottom Shelf }

This years MOH textbook.  An English textbook.  Some Greek curriculum { Elementary Greek }.  Christian Liberty Nature Reader 1.  Scissors in the back, pencils in the front.  My new flash cards all separated into their proper collections.  Black Beauty for Chloe somewhere along the line.  Daniels old scripture journey { that I made, but might use the concept to make a different ones for the girls }.


{ The Top Drawer }

Old, old, old flash cards.  Stapler, hole punch, a couple of cords.  See the A5 piece of paper with writing on it?  Yep, that's my list of blog post ideas that I want to do in August.  Underneath are the girls book reading logs { mine } they have separate ones for themselves.


{ The Bottom Drawer }

Filing. All sorts of things really. School worksheets and what nots to be a bit more clearer.  NO household filing.  Just school stuff.


I hope you enjoyed a quick walk through at my desk. :o)

What's in yours?

Sunday, July 29, 2012

Plain Colored School Paper

How do you store all your plain colored school paper?

This is NOT for patterned / specialty papers - just plain school stuff for school projects.

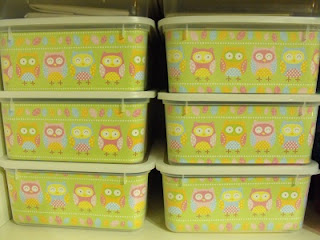
I use these,


and these.  They are just plastic drawers that pull out.


 The boxes don't look very flattering in these photos but in real life one doesn't see all the imperfections on the drawers - so it looks great.


And each drawer holds 500 sheets of 80gsm.  A4 size.


Yes, so do tell, how do you store your paper?


Thursday, June 21, 2012

Programming for School

 
This year I moved our homeschool over to a 4 weeks on, 1 week off pattern.  I used to run along with Australian school terms, but then a homeschool friend told me what they do, and I thought that it might help to make less burnout if I could get more regular rests in there.  So we're giving it a one year trial to see how it goes.

This week is currently a week off.

Last week I programed the next 8 weeks that we're going to need and then I thought that I might like to share about it on my blog.  So, what do I put in it? 

This is my latest one that I made up the other day.  I even put a cute little patterned paper on it.  :o)


I love my binder. It means that I can keep everything together neat and tidy.

At the front of the book I keep the year at a glance.  I cross off each week completed.  At any time I can see what week we are up to, when breaks are coming, and what date each school week starts with.


 This is a sample from Phebe's ( 5y 3m ) program.  We are about to start week 21.  It tells me EXACTLY what pages for which books to use on any given day.

A sample from Chloes ( 7y 3m ) program.   On each day that we do our school work I simply run a texta through each subject as it is completed.


 Here's a shot from Caleb's ( 14y 11m ) program.  When I get to the boys program each subject gets it's own page.  The page here in the sample is for History.  I like History, so I get the children to do a lot of it.  LOL


 This one is Daniel's ( 16y 5m ) sample. 


The boys program is just as simple to mark off as the girls is.  I just run a texta through each subject on the given day when the work is completed.

I also separate each child's pages with a post it note on the side, that way it's easy to locate each child's program pages in the book.

Yeah, so that's basically what my programing looks like.  :o)

Thanks for visiting~!!

Monday, June 11, 2012

Do you remember these?


Well, I went and added some labels.  Nothing fancy.  I just used some craft punches and a sharpie to get the job done.  They are stuck on the outside of the box, so if I ever change the inside contents it is going to be a cinch to change the label too.  :o)  And it won't affect the pretty paper in the boxes either.  Awesome~!!


 Up close with one of the labels.  The outer edge is scalloped.


Up close with one another one. I thought the gacky olive green went well with the patterned paper.

What they look like from a different angle.  :o)


Thanks for visiting~!!  :o)


Friday, June 8, 2012

Remember a few days ago when I showed you my home made pocket chart?   Well, I continued to experiment and make another.

Here's another "nothing wrong with it" book.  I choose it for it's solid cover.  Yes, I did rip out all the pages.   It doesn't hurt them to be ripped.  They don't scream or move or anything.  So feel free to try it some time.  :o)


 I found some really nice, not in your face patterned paper that would work well as a background.  That's important.

This time I decided to work along the lines of my sentence maker.  I made a paper one a few years ago and had that sitting in a cupboard.  I dug out a few little cards and then cut my transparencies to fit them.   I got 4 rows for this one.  I adhered the transparencies with double sided tape.  That way it's almost invisible.


On the other side of the book I had bigger pockets.  This time I had 3 rows.  I put a few cards in to show where the pockets were and what type of cards I could use in it.


Because it's a book - it can stand up alone.  When I'm done, I just close the book and pop it away.

In addition to the above I also made a couple of calendar card sets.

In the file the bug and the numbers are really nice colors.


 But I don't have a colored printer at the moment so I had to settle for a black and white version.


 I made two different themes.  Printed, laminated and cut them out.


Each theme has the month, days of the week, and a set of numbers.


 And they fit awesome into the pocket chart.

So what do you think?  Have I missed my calling in life?  Have you been doing any crafty cool stuff lately?

Thanks for visiting~!!  :o)

Wednesday, June 6, 2012

Repurposing old hard covered books.  Not only repurposing them, but actually going to a second hand store to purchase a couple of old hard covered books with the intention to RIP ALL the pages out - never to even read.  Yep.  I really did that.

Here's the big one I got.  There was really nothing wrong with the book.


 But I ripped out all the pages anyway.  LOL


While I was out I also picked up a packet of these:


 And when I came home I went through my paper stash and pulled these out.


Then I went to work.  I covered the front of the book with my pretty paper.


 Then used my guillotine to cut my overhead transparencies to make POCKETS on top.


Yep, I was making a POCKET chart.  Here's what can fit in it - the cards are 6 x 4 so that gives a bit of an indication as to what size cards will fit.


 And it stands up~!!   Admittedly it isn't as big as the ones you can get for classrooms, but I think it shall work awesome for us here at home.


This is my basic pocket chart - and how I made it.  Now to make ones that will do a calendar, other bits and pieces, and my sentence maker.

Thanks for visiting~!! :o)

Monday, June 4, 2012

I have a love relationship with organisation.  Order is my cup of tea.  Everything must have a place.

On my shelves in the school room I had this:


But then I got all inspired, as one does when they go blog and pinterest hopping.  I got particularly inspired while over at Staci's blog:  Going Nutty.  Staci had been remodeling her plastic drawers.  I didn't have any Mod Podge for my big plastic drawers, so I figured I'd settle for a smaller project.  :o)  What a cool little project this would be if I could dress up these little boxes.

So I got out some patterned paper and thought - what would work with this type of project?


But it didn't stop there.  Oh no, siree~!!

They were looking mighty fine, so I kept right on going - and rearranging my shelves to accommodate.


Until I got them like this.  What do you think? 

Do you think I should LABEL them?

Thursday, May 17, 2012

My Classroom

My Classroom.

I guess some of you might be wondering what our current school room looks like, so I thought that we'd do a little show and tell for you.

First off we have the plastic drawers:  each child has a drawer in the plastic tubs for their personal school books.  The very bottom drawers are for other items.  The white cupboard has paper and craft items mostly.


This is our main library wall.  I can't store all our books here so I've got them stashed all over the place, but this is where I keep all the new / big / valuable / favourite books.


 Our school desk.   Yep, a big 8 seater dining table - we don't eat in here as a general rule, so I never have to worry about food items on the table, so that is good.  :o)


 Shelving full of stuff.  This is where I keep all the little fiddly activities, jigsaws, readinga-z readers, farm animals, train set, and other odds and ends.  I keep worksheets and consumables that we are going to use in the plastic drawers on the shelf.   That's just so that they are easy to grab when we need to use them.  In the pink plastic drawers on the right I keep teachers manuals and other bits and pieces.


 The Kitchenette - also full of stuff ( and books ).  The books are up behind the glass doors.  The bench top is where I store the days work each day.  I also usually have my teachers program open on the top there too for easy reference etc...  Inside the cupboard I keep big tools like staplers, laminating machine, more paper etc...


 I hope you've enjoyed visiting our school room. :o)   I can see that I'd be able to get a few more classroom posts out of all of this if we got up and close with what's in those cupboards.  LOL  That might be more fun.  :o)